CS 106 Winter 2016
Assignment 02: User interfaces
Question 1 Ferryman
Proceeding from provided code, you will create a sketch in which you can use direct manipulation to transport ten circles from the bottom of a tall, narrow window to the top. Once a circle has crossed the "goal line" near the top of the window, it can't be moved any longer. The sketch will log the motions of all the circles to an external file.
- In the provided code, open up the Ferryman sketch. You can try running it, though it doesn't do much initially. Put your name and Student ID number in the comments at the top of the file. Read through the code at least once to learn what the major provided components are.
- The provided code includes a Circle class, which you
don't need to change.
In setup() create an array of ten Circles,
as follows:
- Initially, they should all be vertically centred in the sketch window, with their centres 30 pixels from the bottom of the window.
- They should all have a radius of 15.
- You can give them whatever colours you want, as long as they're all different.
- In the global draw() function, add code to loop over the array above and ask every circle to draw itself.
- Next, add direct manipulation to the circles. As usual, you'll
need a few pieces of code. At a minimum you'll want:
- A global variable to keep track of what circle is
being dragged, if any.
In the Rush Hour question in the lab, we used a variable of type Car to keep track of which Car was being dragged. Here, use an int that stores the index of the active circle in the array above. Use -1 to indicate that there's no active circle. This int will be important later.
- Hooks for mousePressed(), mouseDragged(), and mouseReleased(), similar to the ones you've seen in class and in the lab.
- A global variable to keep track of what circle is
being dragged, if any.
- Finally, add logging, as follows:
- Create a global variable of type PrintWriter.
- In setup(), initialize that variable by opening a text file output.txt, into which we'll write data.
- Every time the user moves a circle (in the
mouseDragged() function), write out a line
with four numbers, separated by spaces:
- The index of this circle in the array of circles (an integer from 0 to 9).
- The time code of the motion (the result of calling the built-in millis() function).
- The new x position of the circle
- The new y position of the circle
- Every time the user stops moving a circle (in the mouseReleased() function), check to see if all circles have crossed the goal line, using the provided function. If all circles have crossed, then flush and close the output file.
- When your sketch is working, run it and ferry all ten circles past the goal line, creating a complete recording as above. You must submit a correctly formatted output.txt file along with your sketch in order to receive full marks! You're free to ferry your circles along any paths you want, in any order, as long as they all eventually make it across the line. I encourage you to use a number of different paths and timings.
Question 2 Impressionist
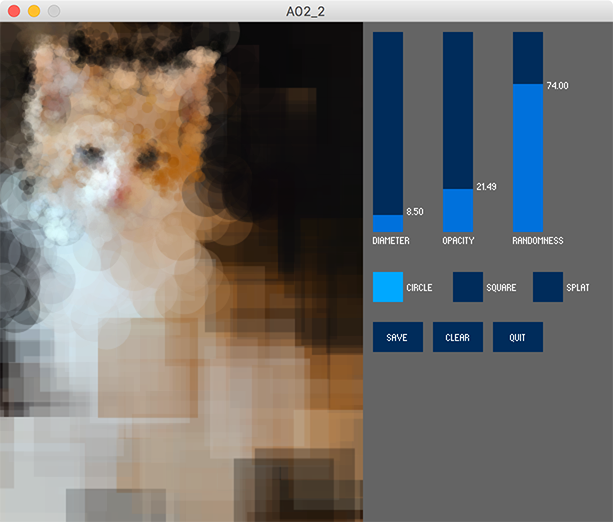
Paul Haeberli's Impressionist is a simple technique for creating faux impressionist paintings from photographs. You are given a simple implementation of Impressionist onto which you must add UI controls using ControlP5. Proceed as follows:
- Open the Impressionist sketch in the provided code. Put your name and Student ID number in the comments at the start of the sketch.
- Run the sketch and paint in the white area in the sketch window. You should see the brush colour changing as you paint; the colours are taken from an underlying image (stored in the sketch folder). Now read through the code at least once, in order to understand how the various parts of the sketch relate to what you saw when you ran it.
- Add a ControlP5 slider to control the diameter of the brush. Choose reasonable minimum and maximum sizes for the brush size.
- Add a slider to control the opacity of the brush, from fully transparent to fully opaque.
- Add a slider to control the "randomness" of the brush. With randomness, paint strokes appear in a random spray around the mouse location, instead of right at that location. I suggest offsetting mouseX and mouseY by different random numbers between -r×d and r×d before painting each stroke. Here, r is the amount set by the randomness slider, and d is the brush diameter. Make sure the spray is centred on the mouse location. Choose a reasonable range for the slider.
- Add at least one new brush shape aside from circles (for example, a square). Add a radio button group that allows the user to have one selected brush at a time. Make sure that without randomness, all brushes are centred on the mouse position (i.e., a square should appear centred on the mouse, not with one corner at the mouse position).
- Add a "Clear" button that erases the painting and starts over with a white canvas.
- Add a "Save" button that saves a copy of the user's painting to an external file. You can't use the built-in save() function, since we want just the canvas area and not the whole sketch. But the provided code includes a function that does the right thing.
- Create a final painting of your own, not based on the provided still life photograph. We may award bonus marks for especially creative or artistic results. When you submit, make sure that your sketch folder contains your chosen source image and a saved image of the painting you created.
Optional enhancements: There are many possible enhancements to this sketch. Think of ways to provide additional feedback to the user, such as a scaled-down copy of the source image in the control area, and a schematic representation of the current brush. Think of ways to dynamically adjust brush orientation, diameter, and colour based on information in the source image. We may award bonus marks for successful and interesting enhancements.
Submission
Remember to review the Code Style Guide and use Processing's built-in auto format tool. Then review the How To Submit document. At the top of all of your source files, be sure to include a comment with your name and student ID number. When you're ready, zip both of the sketches created above (Ferryman and Impressionist) into a single archive called A02.zip and upload that file to LEARN.