CS 106 Winter 2016
Assignment 04: Physical simulation
Question 1 Pool
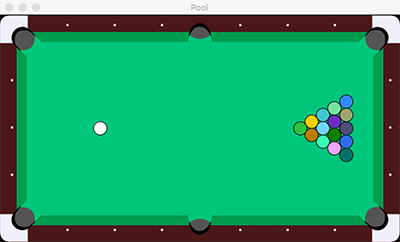
In the provided starter code, open the Pool sketch. You'll see the start of a pool game. There's a cue ball in a black rectangle. You'll turn this into a pool game, as shown in the screenshot above. Follow these steps:
- First, turn off gravity in this physics simulation. If you don't already know how to do this, see the online documentation for the FWorld class. When you turn off gravity, you'll be able to start the sketch and the cue ball will sit perfectly still. Now try clicking on the cue ball, dragging away from it, and letting go. The cue ball will fly away opposite the direction you moved the mouse. We'll use this to simulate the cue stick in pool (this is similar to launching the golf ball in last week's lab).
- In the data/ folder, you'll find a file called pool_table.svg (adapted from clker.com), with a top-down picture of a pool table. Using our old techniques from Module 02, load the SVG into the sketch and display it in the draw() function, after clearing the screen but before asking the Fisica world to draw itself. The SVG is purely for decoration—it makes the sketch look like a pool game, but the ball will roll right over the edge of the table.
- Have a look in the file table_bounds.txt in the sketch data/ folder. This is an eight-line text file that describes some important pieces of geometry: the bounds of the table surface (first two lines), and the "hot spots" of the six holes (last six lines). Below, you'll add these bits of geometry to the physical simulation.
- The first two lines each contain sequences of (x,y) coordinate pairs for points. The points are the vertices of polygons that outline the "legal" part of the pool table. For each of those two lines, you need to create an FPoly object with those vertices. Make sure the polygons are static bodies (so they can't move) and then add them to the world. Now you should be able to shoot the cue ball all around the table without losing it. You can either read the coordinates right out of the file when the sketch starts up, or copy the data into the sketch itself and turn it into arrays.
- The last six lines are simple (x,y) coordinate pairs. For each of those locations, create a small, static circle of diameter 2, which I'll call a "detector". Later, we'll use collisions on these detectors to figure out when pool balls have fallen into the pockets. Store the six detectors in a global array—you'll need that array later.
- The previous two steps covered up our lovely pool table. Fix that by making the boundaries and detectors invisible. See the online documentation for the FBody class, particularly the methods setNoStroke() and setNoFill().
- Add the "pyramid" of 15 balls that make up the rest of the opening position in a pool game. Put the ball at the tip of the pyramid at (450,170). Each successive row of the pyramid is exactly ball_diameter*sqrt(3)/2.0 to the right of the last one, and starts ball_diameter/2.0 higher than the last one. You can work out the coordinates for each ball and write 15 lines of code to add each one, but optionally it's a bit more elegant to use two nested for loops. Use the provided makeCircle() function to create each ball. Give each ball a random colour (or real pool ball colours if you want) and make sure they can't be moved with the mouse (see the setGrabbable() method).
- Finally, add code to determine when pool balls are touching detectors, and remove those balls from the game when that happens. The easiest way to do this is to add code at the top of the draw() function (the only place you need to add code for this feature). Loop over each of the six detectors in the array you saved earlier. For each one, use the provided helper function getCollidingBalls() to obtain an array of all the balls touching that detector. Remove each one from the simulation (using the world's removeBody() method), simulating it disappearing into a pocket.
Question 2 Marble Run

Open the MarbleRun sketch in the provided starter code. You'll see the code for a very basic Fisica simulation. Run it. You'll find that every time you press a key, a ball will appear, which then falls to the bottom of the screen. Your job is to interrupt the descent of the balls by building a marble run—a series of ramps, walls, mechanical devices and other objects that guide balls from the top left of the sketch to the bottom right.
Later, I'm going to try to make larger marble runs by mixing and matching individual sketches. To make that possible, you need to obey some pretty strict rules for how you design your run, and for how you write the code. There are also a few constraints that are just the minimum requirements for this assignment. Here are the rules:
- The sketch must have size 640×400 (this is the way the provided code is set up).
- The marbles will enter at coordinates (70,0). Make sure your sketch has an opening there! Make sure your sketch runs smoothly when you create marbles with the provided keyPressed() hook.
- Your job is to deliver the marbles to location (570,400), at the bottom right of the sketch. They don't have to pass exactly through that pixel, but they should definitely fall near there.
- The marbles should only leave the sketch at that location. Make sure they can't escape out of the sides of the sketch, at other locations along the bottom, etc.
- The marbles will have diameters of 30 pixels. Make sure your run is large enough to accommodate marbles of that size.
- You should be able to deal with a rate of marble creation of about one per second. It's OK if some of those marbles get stuck in your run, as long as most of them make it out the other end.
- You can do that with any combination of Fisica objects (circles, boxes, polygons, joints, etc.), as long as you follow the additional rules below.
- Your marble run must contain at least five static bodies (things that are completely frozen in the world, and act as walls to guide the marbles).
- Most marbles should touch at least three distinct static objects on their way through your run.
- You must use at least one box (FBox) and at least one polygon (FPoly).
- The behaviour of the marble run should be repeatable: no matter how many marbles you drop into the opening at the top left, you should be able to carry them to the bottom right. So you can't have any kind of mechanism that's designed to work only once, and that will stop future marbles from completing the run.
- The marble run needs to be autonomous. You should be able to describe its shape and behaviour entirely at startup time, and not rely on additional run-time intervention. So you're not allowed to add code to the draw() function, and you're not allowed to add any hooks like contactStarted().
- Please follow the comments in the provided code: add code only in the indicated region. In particular, make sure that your createWorld() function does all the work needed to put your marble run in place. Don't change anything else outside that region of the sketch, except for editing the comment at the very top of the file to add your name and student ID.
Within those constraints, you're free to design your marble run however you want. You might want to sketch out a few ideas on paper first. Of course, I encourage you to experiment with fancy geometry and mechanisms, though you may need to dig a bit through documentation and examples. (For example, notice that the FRevoluteJoint class can be used to construct spinning motors.) We may award bonus marks for especially ingenious or creative designs.
Submission
Remember to review the Code Style Guide and use Processing's built-in auto format tool. Then review the How To Submit document. At the top of all of your source files, be sure to include a comment with your name and student ID number. When you're ready, zip both of the sketches created above (Pool and MarbleRun) into a single archive called A04.zip and upload that file to LEARN.