CS 106 Winter 2016
Lab 04: Physical simulation
Question 1 Lever
You will implement a very simple physical simulation in which you can drop a ball onto a lever in order to launch a second ball into the air, trying to make it land in a basket.
- Open the Lever sketch in the provided code. Read through the source code to familiarize yourself with the layout. Now run it. You get an empty environment bounded by four white walls. You can press the mouse button anywhere in the sketch. While you're holding down the mouse button, a ball will grow from the mouse position. When you let go of the mouse, it will fall.
- Now add some physical objects to the sketch:
- Create a fulcrum, the point upon which your lever will balance. The fulcrum should be a small triangle at the bottom of the sketch. Make the fulcrum static so that it doesn't move.
- Create a load arm, the main part of the lever that tilts over the fulcrum. The load arm is actually two parts: a big rectangle with a small rectangle sticking up from its right side (to hold the ball). Use an object of type FCompound to create a single physical object that contains both of these rectangles (which are themselves objects of type FBox). Add the rectangles to the compound, not directly to the world.
- Create a ball, a circle 20 pixels in diameter that will be held by the load arm.
- Create a basket, a static object near the top left of the sketch that you'll try to launch the ball into. The basket can be made of one or more objects, as long as it doesn't move and can hold the ball.
You don't have to copy the pictures here exactly. You can use your own location and shapes for your launcher, as long as it works similarly to the demo video. When you first start the sketch, the moving pieces of the simulation can be floating slightly above their resting places. But once the simulation "settles down", you should get a simple lever configuration. The two images below show the configuration at the very beginning of my solution, and the configuration after all the pieces settle down.


- You can now try to launch the ball by creating a weight above the other side of the lever, and dropping it, as in the video above. Tweak the positions of the objects in your sketch so that you're actually able to get the ball into the basket, at least some of the time.
Optional enhancement: If you have time, try to detect that the ball has gone into the basket, and offer some kind of visual feedback (maybe keep track of a score and reset the game to its initial position?). The obvious way to do this is to add a contactResult() hook (see the online documentation for the FContactResult class). But don't just check for any collision between the ball and the basket—what if the ball collides with the underside of the basket? The best solution may be to put a special object inside the basket, and to detect collisions on that object. Obviously, you can also play around with the rendering: change the colours of the objects and the background, add images, etc.
Save your work in a sketch called Lever. (If you start with the provided code, this should be automatic.)
Question 2 Revenge of revenge of Rush Hour
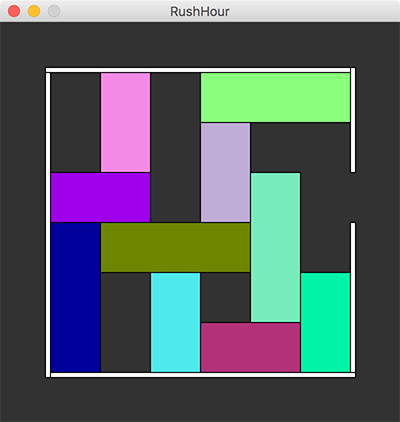
Let's take one more stab at the Rush Hour game, this time using physical simulation.
- Open the RushHour sketch in the provided code. Read through the code once, and run the sketch (which doesn't do anything initially). Note the provided array rects, which defines the same car rectangles as the ones that were provided in Lab 02. That's the layout you're looking for.
- In setup(), turn off gravity in the simulation. See the documentation for the FWorld class for a method that will help you do this.
- Add code to setup() that walks over the
rects array, and creates a rectangle for each car
from the four numbers in each line of the array. Here are a few
additional notes on how to do that:
- You'll need to walk over the array four steps at a time.
- Give the cars any colours you want, random or otherwise.
- Each line of the array tells you the width of a car, the height of a car, and the x and y coordinates of its top left corner.
- Scale (i.e., multiply) all widths and heights by 50.
- Scale all x and y values by 50 as well, and then add 50 to them. If you do this right, the grid of cars should be centred in the sketch as in Lab 02.
- Use an FBox for each car. But note that when you set the position of an FBox, you provide the x and y coordinates of the centre of the box. You'll need to determine the location of this centre from the coordinates of the corner, combined with the information about the width and height.
- It will probably help to write a separate helper function, something like createBox().
- Finally, Add thin rectangles that make up a boundary containing all the cars. These rectangles should be static, so that they prevent the cars from leaving the game in every direction, and don't themselves move around. Leave a gap in the rectangles as depicted above, so that in theory the goal car can be slid out from the left edge of the game to the right. In the screenshot above, the rectangles are all of size 5 in their thinner dimension.
When the sketch is working, you should be able to play the Rush Hour level—badly. It'll be possible to jostle all the cars out of a grid configuration in order to get the goal car through the slot. A lot more work would be required to make sure the cars can move only in intended ways, but our sketch here can still be fun to play with.
Save your work in a sketch called RushHour. (If you start with the provided code, this should be automatic.)
Submission
Remember to review the Code Style Guide and use Processing's built-in auto format tool. Then review the How To Submit document. At the top of all of your source files, be sure to include a comment with your name and student ID number. When you're ready, zip up the entire L04 folder containing the two sketches above (Lever and RushHour) into a single archive called L04.zip and upload that file to LEARN.