CS 106 Winter 2017
Assignment 04: User Interfaces
Question 1 Magnetic Poetry
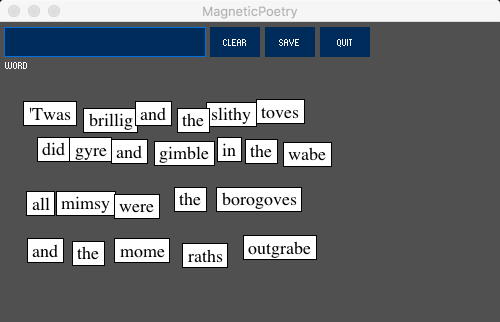
Many of you will have grown up with magnetic poetry, little words printed on fridge magnets that could be rearranged into blocks of text. In this assignment you will develop a sketch that allows you to create words of magnetic poetry (using ControlP5 widgets) and move them around (using direct manipulation).
The interface must support the following features:
There is a text box (a Textfield in ControlP5) where you can type a word. When you press return, the word is turned into a new tile of magnetic poetry, and placed at a random position in the sketch window.
Every tile can be moved using direct manipulation: you can click anywhere in the tile, drag it around the sketch window, and release it to put the word in a new location.
There is a "Clear" button. Pressing the button resets the sketch by removing all the words currently shown.
There is a "Save" button. Pressing the button stores a PNG screenshot of the sketch in the file "output.png".
There is a "Quit" button. Pressing the button terminates the sketch.
To begin, download the starter code. You'll notice that the MagneticPoetry sketch contains two tabs. The first is the main sketch program, which has just a bit of code written for you. The second is a helper class called Word, which holds one word of magnetic poetry and knows how to measure the rectangle that the word will be drawn inside of (its "tile"). Read through the class, and try to get some sense of how to use the features that are provided (and what features you might add to it). With that starter code, we suggest you proceed as follows:
Add the ControlP5 library to the sketch. You'll need the import directive, a global variable, and a statement that initializes the global variable inside of setup().
Add a Textfield widget to the sketch with the label "Word". You are free to choose the layout of the user interface elements as you wish, as long as they don't interfere with each other or the rest of the sketch. Note that the BusyBox sample sketch demonstrates the use of a Textfield in ControlP5.
Add a global variable to the sketch to hold an array of the Word objects corresponding to the tiles of magnetic poetry. When the sketch starts, the array should be initialized to a new array with zero elements in it. See the DirectManipCircleArray sample sketch for inspiration.
Add code to draw all the Words in the array. This will certainly involve a loop in the main draw() function. As for drawing each individual Word, you can put all the code for that in draw() if you want, but a more elegant approach is to add a new draw() method to the Word class and then call that method from the sketch's main draw() function. (You won't be able to see this working at first, because you need to populate the sketch with some words. That'll happen in the next step.) The Word class gives you the (x, y) at which to draw a magnet's text, and it provides helper methods to allow you to figure out the rectangle to draw around the word.
Add a controlEvent() hook to the sketch. When an event is detected on the Textfield, create a new Word tile using the text in the Textfield. Then append the newly created Word tile to the global array of Words. Give the new Word a random initial location in the sketch window (ideally, one that doesn't conflict with the user interface widgets).
Add mousePressed(), mouseDragged(), and mouseReleased() hooks to the sketch that support direct manipulation of all word tiles currently visible. Make sure to hit test the tiles in the opposite order that you draw them. (If you add new Words to the back of the array, you should iterate over the array from back to front when hit testing.) You may want to implement hit testing as a method inside the Word class. Again, the DirectManipCircleArray sample sketch could be a useful source of inspiration for this step.
Add a "Clear" button that removes all the words from the sketch (note that the actual resetting of the array of words can be done in one simple line of code).
Add a "Save" button that takes a screenshot of the sketch window and stores it in the file output.png. Note that the ControlP5 widgets do not show up in the screenshot (which is kind of nice!).
Add a "Quit" button that terminates the sketch (by calling the built-in exit() function).
Save your work in a sketch called MagneticPoetry in a folder called A04.
Submission
When you are ready to submit, please follow these steps.
If necessary, review the Code Style Guide and use Processing's built-in auto format tool. You do not need to use the precise coding style outlined in the guide, but whatever style you use, your code must be clear, concise, consistent, and commented.
If necessary, review the How To Submit document for a reminder on how to submit to LEARN.
Make sure to include a comment at the top of all source files containing your name and student ID number.
Create a zip file called A04.zip containing the entire A04 folder and all its subfolders.
Upload A04.zip to LEARN. Remember that you can (and should!) submit as many times as you like. That way, if there's a catastrophe, you and the course staff will still have access to a recent version of your code.
If LEARN isn't working, and only if LEARN isn't working, please email your ZIP file to the course account (see the course home page for the address). In this case, you must mail your ZIP file before the deadline. Please use this only for emergencies, not "just in case". Submissions received after the deadline may receive feedback, but their marks will not count.