CS 106 Winter 2017
Lab 04: User Interfaces
Question 1 Direct Manipuation of an Image
In this exercise you will practice creating a direct manipulation interface by adding code to a sketch that allows you to move and scale an image.
In the starter code, open the sketch DirectManipImage. Don't bother running it yet— it'll just crash.
Add any image you want to the sketch. The only constraints are that the image's width and height each be at least 100, and no more than 400. Now locate the loadImage() line in the sketch, and change it so that it loads the image you just added. Now you should be able to run the sketch and see your image.
Add code to the sketch that allows you to move the image by clicking and dragging anywhere inside its bounds. You'll need to change the code in a few places:
Add a global variable to keep track of whether or not the image is currently being dragged.
Now add a trio of hooks, mousePressed(), mouseDragged(), and mouseReleased(). These functions work together to move the image as the mouse is dragged, much like the examples shown in class. Make sure that the image moves only when you initiate a drag by clicking inside the image (by using the right hit test in mousePressed()).
Notice that the starter code draws a small disc in the lower-right corner of the image. We'll use that as a handle to initate scaling. When you click in the disc and drag, you move the disc around the screen. As that happens, the top-left corner of the image stays fixed but the image scales so that its bottom-right corner sits underneath the handle.
You can add code very similar to the code for moving the image: a second global variable, and changes to the three hook functions. But you'll be hit testing against a small circle this time, instead of a big rectangle.
Your sketch must support both interactions. You should give precedence to the scaling handle over the image rectangle. That is, if the user clicks in the tiny region where the handle overlaps the image, it should initiate a scaling operation and not a move. (Therefore, hit test against the disc first, and the image second.)
Save your work in a sketch called DirectManipImage. Put it in a folder called L04 (If you start with the provided code, this should be automatic.)
Question 2 Spirograph
A Spirograph is a classic drawing toy in which a gear holding a pen rotates inside or around a larger gear. You will be given code to draw Spirograph designs, to which you must add interactive user interface controls using ControlP5. Proceed as follows:
- Download the provided zip file and unzip it. Open the Spirograph sketch.
- Initially, the sketch doesn't do anything. Add a call to drawSpirograph() at the end of draw() and run the sketch to see a simple Spirograph pattern on the screen. Congratulations, that's the only change you need to make to draw().
- Now add the basic skeleton of the ControlP5 library:
- An import statement at the top of the sketch.
- A global variable that holds an instance of the ControlP5 class.
- A line in the setup() function that initializes the global variable to a new ControlP5 instance.
- Next, you're ready to add your first UI element. Create a slider
to manipulate the global variable big_teeth:
- Add code to setup() to build a slider (using the addSlider() method of your ControlP5 instance). Store the result in a global Slider variable.
- Give the slider a reasonable size and position in the window (keeping in mind that you'll be adding a few additional UI elements).
- Constrain the slider to range over values from 20 to 120. You can also call the method setDecimalPrecision( 0 ) on the slider so that its display rounds to whole numbers.
- Finally, create a controlEvent() hook at the bottom of the sketch, as demonstrated in class. When you detect that your slider was manipulated, get the slider's value and store it in the global variable big_teeth. Once that's working, you should be able to move the slider and see the Spirograph drawing change interactively.
- Repeat the process above with a second slider to control the variable little_teeth. Let that slider range over whole number values from 10 to 60.
- Next, add a slider to control the variable l, which can range over real numbers between 0 and 1.
- Next, add a slider to control the radius, which can range over real numbers between 50 and 250.
- Finally, add a toggle switch that controls the boolean variable inside (see the ControlP5 addToggle() method). Clicking the toggle should flip the value of the global variable, flipping the Spirograph drawing over to the outside of the large gear (it'll get larger).
- Make sure to arrange your interface in a reasonable way (widgets
that don't overlap and don't get too much in the way of the
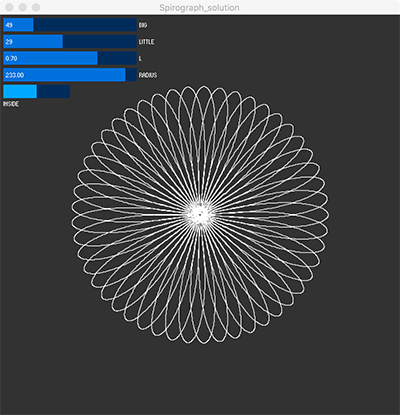
drawing). Here's an example.
Save your work in a sketch called Spirograph. Put it in a folder called L04 (If you start with the provided code, this should be automatic.)
Submission
When you are ready to submit, please follow these steps.
If necessary, review the Code Style Guide and use Processing's built-in auto format tool. You do not need to use the precise coding style outlined in the guide, but whatever style you use, your code must be clear, concise, consistent, and commented.
If necessary, review the How To Submit document for a reminder on how to submit to LEARN.
Make sure to include a comment at the top of all source files containing your name and student ID number.
Create a zip file called L04.zip containing the entire L04 folder and all its subfolders.
Upload L04.zip to LEARN. Remember that you can (and should!) submit as many times as you like. That way, if there's a catastrophe, you and the course staff will still have access to a recent version of your code.
If LEARN isn't working, and only if LEARN isn't working, please email your ZIP file to the course account (see the course home page for the address). In this case, you must mail your ZIP file before the deadline. Please use this only for emergencies, not "just in case". Submissions received after the deadline may receive feedback, but their marks will not count.