CS 106 Winter 2017
Lab 06: Recursion and Randomness
Question 1 Wheels
Given a circle, it's possible to draw three smaller circles inside of it, all of the same radius, so that the three circles just touch each other and the original circle:
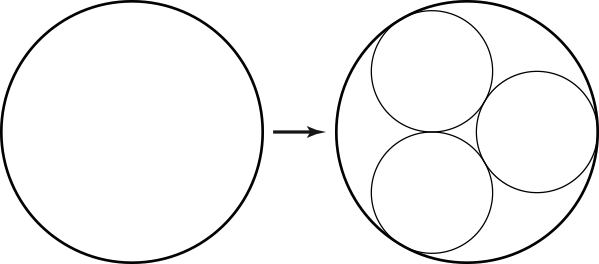
(This is sometimes called an arrangement of "kissing circles".) Of course, this arrangement suggests a recursive extension: just repeat this process inside each of the smaller circles. Keep doing that to any number of recursive levels, and you end up with a kind of nested fractal arrangement of circles, a bit reminiscent of a Sierpinski gasket:
There's one tricky mathematical question in determining this nesting relationship. How large is the radius of a circle relative to the radius of its parent circle? It turns out that you can compute this with some trigonometry. You end up with a constant we'll call scaling_factor, equal to about 0.4641 (don't worry, the starter code will provide this for you).
Download the starter code and unzip it. Open the Wheels sketch. You will see what is hopefully by now a familiar structure for a sketch that draws a picture recursively. The only piece missing here is the body of the recursive function (marked in the code with a TODO comment). Your task is to fill in that body so that the sketch as a whole draws the fractal shown above.
Proceed as follows:
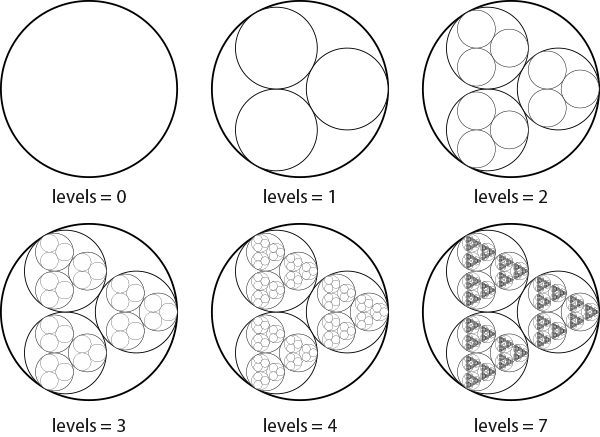
No matter what recursive level you're at, always draw a single circle. The circle should have its centre at (0,0) and have diameter 500. If you add a single line of code to drawWheel() to draw such a circle, you should be able to draw the outer circle labeled "levels = 0" above.
If there are still recursive levels left to draw (i.e., if levels is greater than zero), then recursively draw three smaller copies of the wheel fractal. Each recursive call should be embedded inside of a geometric context that translates, rotates and scales the design (not necessarily in that order) so that it maps into one of the smaller nested circles (see the sample sketches CirclesFractalGeometricContext, SierpinskiGasketGeometricContext, and SierpinskiCarpet). Ideally, use a for loop to make the three recursive calls (but this is not required).
If it helps, note that the centres of the three child circles shown in the "levels = 1" step above are all at distance 250.0-250.0*scaling_factor from the centre of their parent circle, and have radius 250.0*scaling_factor.
If all goes well, you'll have to write only about 10–15 lines of code to make this work. Make sure that your geometric contexts scale by the global variable scaling_factor, provided in the starter code.
Question 2 Gravel Stones
In the slides for this module, have another look at Gravel Stones by Georg Nees. We discussed it as a canonical example of generative art: using the computer to inject a design with an "exactly calculated dose of randomness". You will use Processing to recreate this artwork.
In the starter code, open the sketch GravelStones. Most of the coding is already done for you. You will find global variables to control the width and height of the grid of random squares, and the size of each square. There is also a simple ControlP5 interface consisting of a single slider to control the amount of randomness used in the sketch. Beginning there, proceed as follows:
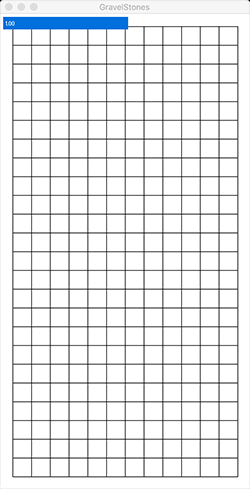
Draw a grid of plain squares with no randomness. The grid should be cols cells wide and rows cells tall, and each grid cell should be a square of side length dim. Centre the grid so that there is a uniform margin of width margin on all four sides. You should get a sketch that looks like this:
Next, give every cell a random rotation between -45 degrees and 45 degrees. The result should look something like this:
This step should require a single new line of code.
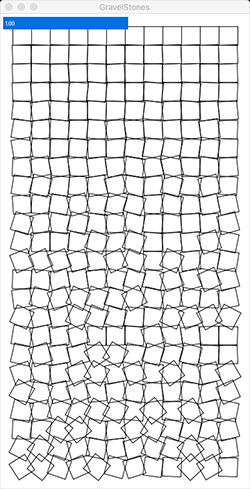
Now for the trickiest step. Change the sketch so that the amount of random rotation is controlled by the cell's vertical position in the sketch window. Cells in the top row should not rotate at all, and cells in the bottom row should rotate by a random amount in the full range from -45 degrees to 45 degrees.
To make this step work, let's assume you have a for loop that counts which row of the grid you're drawing; the loop counter starts at 0 and goes up to rows-1. Define a float (inside the loop) that maps the loop counter into a number between 0 and 1. Multiply your random rotation amounts by this new variable, so that cells higher in the sketch window can't rotate as much. The result will look like this:
This step shouldn't require a big change to the code; you'll need a single new line of code to define the variable described above, and a modification to the line from the previous step that does the rotation.
-
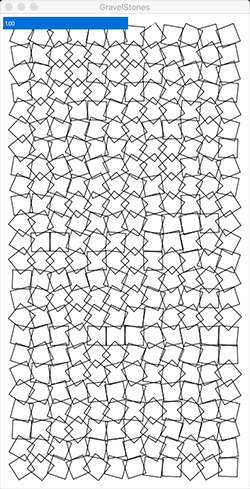
Repeat Steps 2 and 3 to control the translation of each grid cell. Add different random amounts in x and y to the translation of every cell, ranging from -5 to 5. Now use the same variable you created in Step 3 to vary the extent of the translation across the sketch window, so that squares at the top don't move at all and squares at the bottom can move by the maximum possible distance. You'll end up with a design like this:
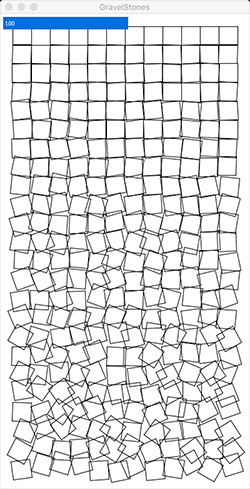
Make sure that your squares can move in any direction (i.e., that the amount of random translation can be positive or negative.)
-
Finally, modify the code so that the slider (which we haven't used yet) acts as a global "volume knob" on the total amount of randomness. When the slider is turned down to zero, all randomness disappears and we get back the drawing in Step 1. When the slider is set to one (the default), we get drawings like the one in the previous step.
This step should require a single change to one line of code. Simply multiply the variable you defined in Step 3 by the current value of the slider.
Note: to make later steps easier, draw each grid square by translating it in a geometric context. That is, use the call rect( 0, 0, dim, dim ) to draw a square, and pushMatrix(), translate() and popMatrix() to wrap a suitable context around the draw call. Note that because of the use of rectMode( CENTER ) in this sketch, you'll need to translate by an additional half the side length of the square in x and y to get the grid to be centred.
This entire step should require 8–10 lines of code.
Note that you'll be making three separate calls to random() when drawing every grid cell: two for the translation and one for the rotation. Don't use the same random number more than once in a given frame!
Submission
When you are ready to submit, please follow these steps.
If necessary, review the Code Style Guide and use Processing's built-in auto format tool. You do not need to use the precise coding style outlined in the guide, but whatever style you use, your code must be clear, concise, consistent, and commented.
If necessary, review the How To Submit document for a reminder on how to submit to LEARN.
Make sure to include a comment at the top of all source files containing your name and student ID number.
Create a zip file called L06.zip containing the entire L06 folder and all its subfolders.
Upload L06.zip to LEARN. Remember that you can (and should!) submit as many times as you like. That way, if there's a catastrophe, you and the course staff will still have access to a recent version of your code.
If LEARN isn't working, and only if LEARN isn't working, please email your ZIP file to the course account (see the course home page for the address). In this case, you must mail your ZIP file before the deadline. Please use this only for emergencies, not "just in case". Submissions received after the deadline may receive feedback, but their marks will not count.