Figure 1
Part 1: Static Routing
Part 2: DHCP
Report: Template
Lab Access: Reservation
Please submit the lab report via Dropbox on Waterloo Learn with file name "CS456 Lab - username1,username2.pdf". (Exact spelling, no other name allowed). The user name is your quest login name, not your student ID. Please use the same user names in the reservation system. Only one student in the group should submit. Please convert the lab report to pdf and submit the pdf version.
You only need to answer the questions in the lab report template above. You can ignore the other questions in the original lab manual.
The goal of the lab exercises is to obtain hands-on experience with network configuration and administration. CS 456/656 students must carry out lab experiments and produce lab reports. It is highly recommended to work in groups (please use Piazza to find a partner, if necessary). The lab exercises are based on the following book:
Mastering Networks - An Internet Lab Manual
Jörg Liebeherr and Magda El Zarki
Addison Wesley 2004
Copies of the book are on reserve in the library. This document describes the available infrastructure (which differs in some details from the one described in the book) and general procedures for carrying out the lab experiments. A separate document provides detailed instructions and notes for each lab experiment.
The teaching lab is open 22 hours a day (7am - 5am, all PCs will be reinstalled at 5am), 7 days a week. The key code for MC3007A is on the reservation page. Do not enter the teaching lab without a reservation. Keep the doors locked and lights turned off whenever you leave the room. Please NEVER turn off any machine in the lab. Please NEVER unplug any cable at the back side of the rack
Lab slots can be reserved for weekend days, but keep in mind that technical support might be limited during weekends. However, due to the limited number of slots available, it might be helpful, if some groups reserve weekend slots. Please see Communication for further details.
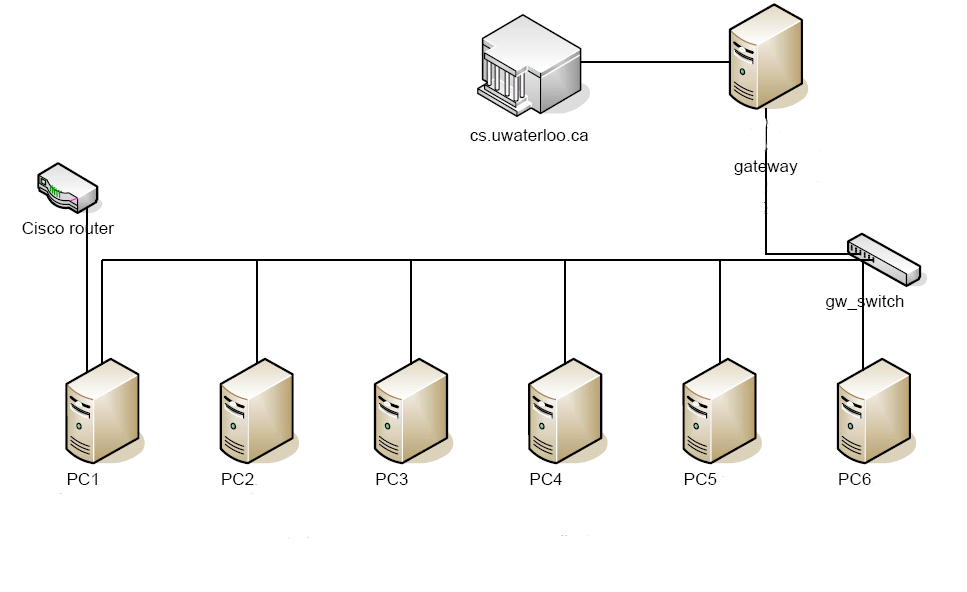
The lab experiments involve hooking up computers with various network devices and setting up different services and configurations. This section describes the equipment in the lab. The setup described in the Liebeherr/El Zarki book has four PCs and four routers. In our lab, however, there are six PCs and one router. The PCs are labelled PC1 to PC6 in each station.
Figure 1 below shows the physical setup of the lab.
|
|
|
Figure 1 |
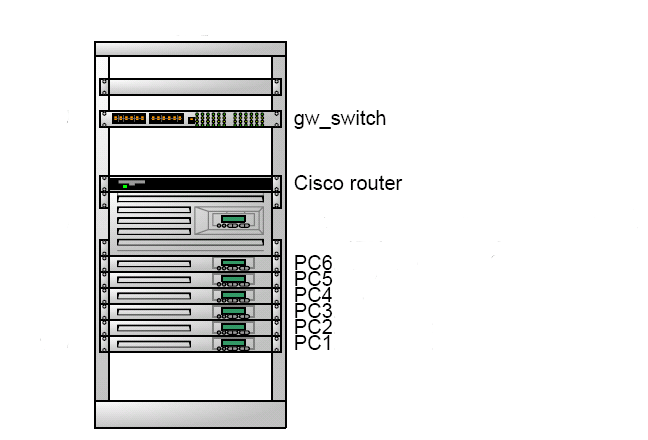
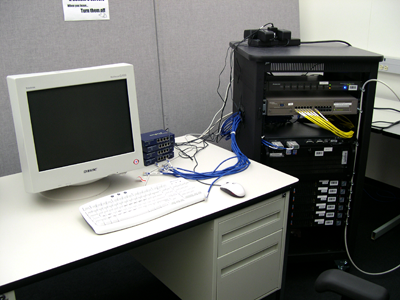
In contrast to the setup described in the Liebeherr/El Zarki book, the UW setup has an additional administrative network, which is used for installation and maintenance. In particular, the interface em1 is part of the administrative network on each PC and not part of the experimental network. The configuration of the administrative network is not part of the lab experiments and must stay unchanged. Figure 2 and 3 illustrate the administrative network setup.
|
|
|
Figure 2: Equipment and administrative topology |
|
|
|
Figure 3: Equipment placement |
Ethernet switches are provided for use during the lab experiments. You will need to plug in Ethernet cables that are located at the station. All cables are straight-through cables.
The KVM is located between switch and the 6 PCs. Button 1-6 are for PC1 - PC6, while Button 8 is for the gateway. You can also type Ctrl Ctrl PC# (e.g. Ctrl Ctrl 1 for PC1) to switch to PC#. These shortcuts have the same effect as pushing the buttons on the KVMs.
The gateway PC is NOT actively used during the lab experiments. It is part of the admin network and is there for maintenance purposes. Please LEAVE IT ALONE and LEAVE IT RUNNING at all times.
The Cisco routers in the lab are the Cisco 2500 series, running version 12.2(7a) of the Internet Operating System (IOS). Each station has one of these routers. You will be connecting and performing configurations with the router. The console line of the router is connected to COM1 of PC1.
The teaching lab has a system in place to install a fresh copy of the operating system each day. This is necessary because the lab exercises involve changing key configurations and may leave a machine in an unknown state. If applicable, the customized password is also set at that time. The process is generally stable, but occasionally fails. The following lists provide detailed instructions for starting and finishing the lab experiments.
If a PC is not in a clean state, it may require manual installation.
Reboot the machine to see the welcome screen.
Type 'reinstall' at the prompt instead of hitting ENTER. This starts the installation process. No user input is required until the machine is fully installed. This process takes 3-5 minutes. You should be able to login using the password given to you when the installation has been completed successfully.
Note that ALL DATA stored on that PC will be LOST after reinstallation.
The following section describes the symptoms of certain failures and the appropriate action to be taken. Note that the state of each PC is independent of one another. You need to check the state of each PC when starting them up.
If the gateway is originally running, the cable connection between the gateway and the PC may be loose. Check that they are connected by checking the LEDs on the gateway switch. If any LED for the PCs or gateway is off, plug in the cable firmly. Check both ends of the cables. If the LEDs still does not light up, check that the gateway switch is on. If all fails, there may be an equipment failure. If the connection between the gateway and PC can be established, follow the procedure Manual PC Installation.
The welcome menu shows up, but when I
hit ENTER, the OS does not boot up.
The OS is likely corrupted.
Reboot the machine and follow the procedure Manual PC Installation.
When I enter the lab, the PC is
already running, and there is a BIOS message (such as S.M.A.R.T.
warning).
Follow the on-screen instructions to get pass the
warning. Then when the welcome screen appears follow the procedure
Manual PC Installation.
When I enter the lab, the PC is
already running, and there are error messages scattered across the screen.
One of the error messages suggests the Fedora installation has
failed.
The installation process aborts abnormally sometimes.
Reboot the machine and follow the procedure Manual PC Installation.
The KVM does not have a green
selected light and pressing the buttons does not cause any change.
Restart the KVM. Press enter for username and password.
The PC boots up and the login screen appears. However, the password given to me does not work.
If the installation time stamp correctly shows today's date, there may be problems with retrieving the password correctly. Try a few times to make sure you did not type the password wrong or mistakenly typed 1 (one) as l (letter L) or vice versa. If all fails, contact the course staff as per Communication.
If the installation time stamp is old, reboot the PC and follow the procedure Manual PC Installation.
If you are not sure whether the PC has been reinstalled properly (by inspecting the installation time stamp), reboot the machine and follow the Startup procedure closely.
The routing table / configuration file(s) is a
mess
Rebooting the machine will usually clear the routing
table and interface settings to defaults. If this still does not
work, you can perform a clean install of the operating system as
described in Manual PC Installation.
Note that ALL DATA stored on that PC will be LOST after
reinstallation.
General lab-related questions should be sent to Piazza. For immediate technical assistance while in the lab, after having thoroughly checked all available information, send email to the TA in charge of the lab and to the instructor. Ideally use "CS456 LAB" as subject line. Unfortunately, we cannot guarantee any fixed response time, especially on weekends. TA email:
The MEFnet lab infrastructure has been supported by the Math Endowment Fund and the School of Computer Science through teaching grants.