CS 488/688: Introduction to Computer Graphics
Fall 2018 Assignment 3: Puppet

Summary
In this assignment you will create a hierarchical, articulated 3D humanoid model, which we'll call a "puppet". By "articulated" we mean that the puppet has a number of hinge-like joints whose angles can be controlled interactively, for example bending an arm at the elbow. By "hierarchical" we mean that the puppet is encoded in a hierarchical data structure that represents parent/child relationships between body parts; for example, when the elbow bends, the hand and fingers stay attached to the lower arm and rotate with it. The whole puppet will be constructed from transformed instances of simple geometric primitives, and will be lit interactively, using a combination of lights and materials that make the 3D structure clear and comprehensible. You must also support interactive undo/redo of joint manipulations.
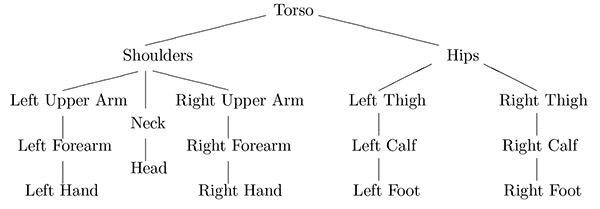
The on-screen puppet is the visualization of a many-layered tree data structure. The "skeleton" of the tree represents the functional, hierarchical relationships between the body parts in the puppet. Thus, the root node is tied to the torso of the puppet, and gives the model-to-world transform of the puppet as a whole. The root has two children as part of this skeleton: a subtree anchored at the shoulders, containing further subtrees for the arms and head, and another anchored at the hips, containing subtrees for the legs. The skeleton might be visualized loosely as follows:
The actual tree you construct will have many more internal
nodes. For example, you'll likely want to include intermediate
transformation nodes that represent the geometric relationships
between body parts and their parents (for example, that the lower
arm has its centre of rotation at the elbow, and is positioned at
the end of the upper arm). In addition, you'll naturally want to
associate geometry with these abstract body parts! Most of these
nodes are likely to have subtrees coming off of them with rigid
arrangements of transformed primitives, giving actual form to the
puppet. (We provide you with a small class hierarchy to implement
the required tree nodes, consisting of a SceneNode base
class with its children JointNode and GeometryNode;
those classes can be used in lots of ways
inconsistent with the description here, but we recommend you stick
to our suggested approach.)
Your final puppet might look something like this:
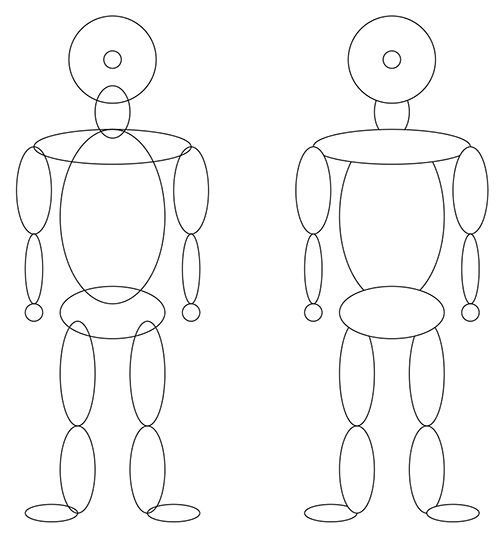
The figure on the left shows the full overlapping outlines of scaled spheres; the one on the right has hidden surfaces removed. You are welcome—indeed encouraged—to improve upon this basic structure to create your own interesting puppet. Feel free to add more geometry and more skeletal structure (and hence, more points of articulation). You can add fancier joint types, new geometric primitives, custom materials and lighting, and just about anything else you like. Have a look at the online CS 488 gallery for past examples of wild puppets. Just make sure your puppet fulfills a few minimal requirements:
- The puppet should support at least fifteen degrees of freedom
(DOFs), that is, joint angles that can be manipulated interactively.
For the humanoid puppet above, there are
three DOFs each arm and each leg, and three more for the
head and neck, as follows:
- The arm DOFs should correspond to the rotation of the upper arm at the shoulder, the lower arm at the elbow, and the hand at the wrist. These rotations should all take place in the same plane (as in the arm motion one might make when lifting weights).
- The leg DOFs should correspond to the rotation of the upper leg at the hip, the lower leg at the knee, and the foot at the ankle.
- The head and neck DOFs should correspond to the rotation of the base of the neck at the shoulders, the head at the top of the neck, and the side-to-side rotation of the head around its axis.
- All angles should have reasonable legal ranges, enforced by the user interface. For example, it should not be possible to hyperextend the knees or elbows, to rotate limbs through each other, or to rotate hands or feet to less than 90 degrees from arms or legs.
- The head should not simply be an undecorated sphere. Make sure to include at least some piece of geometry that allows us to see that head rotation is working correctly.
- You should use multiple distinct materials (see the
set_material()method below) and the scene should be lit using at least one light source. The simplest light source to implement is a point light located at the eye.
Modelling
The structure of the puppet is not contained in the source code of the application, but in an external file that is interpreted when the program starts. Rather than creating our own file format for describing puppets, we introduce Lua as a scripting language. We're already using Lua (as part of premake4) to create Makefiles, and the language has been used extensively in games. Note the potential benefit here: because the puppet is defined procedurally, you can take advantage of standard programming abstractions to streamline your design (for example, think about writing a function to generate an arm, and then calling it twice). We will continue to use Lua to describe scenes in Assignment 4.
To begin constructing a puppet, we need a root for our modelling hierarchy. We can get one by asking for a transform node and assigning the result to a Lua variable. The name passed to the function is useful for debugging purposes.
myroot = gr.node('root')
Geometry nodes hold and can render mesh data. In order to create a geometry node, you pass in the ID of the mesh you want to use, and a node name as above. Then you need to connect it to a parent node:
torso = gr.mesh('sphere', 'my_torso')
myroot:add_child(torso)
Note the use of a colon above. In Lua, ":" is used to call a member functions on an instance and "." is reserved to call regular functions or static class functions. We might then set the material properties of and transform the torso:
torso:set_material(gr.material(...))
torso:translate(1.0, 2.0, 3.0)
Finally, we simply return the root node of the puppet:
return myroot
Conceptually, the transformation at a node is applied to both its geometry and its children, and matrices deeper in the tree are premultiplied by matrices higher in the tree.
As mentioned earlier, the tree shown above shows only the functional relationships between puppet components. Your tree will need to have additional joint nodes, containing transformations and joint rotation ranges. You will transform these joint nodes to manipulate the puppet. You may also need extra nodes to prevent child nodes from being affected by transformations meant to modify only the geometry of a parent node. Watch out, in particular, for scales. You generally will not want these in the middle of a chain of transformations.
We define the following set of modelling functions for you, as the tools we expect you'll need to complete the assignment:
gr.node(name): Return a node with the given name, with the identity as its transformation matrix and no children.gr.mesh(id,name): Return aGeometryNodetied to the mesh with the given ID, and with the given name. The meshes are stored in theAssets/directory, and are loaded and associated with IDs at program initialization time—see the use ofmeshConsolidatorinA3::init(). You can use that mechanism to add additional mesh types to the program, but keep in mind that the goal of the assignment is to assemble an articulated model from a large number of relatively simple parts, not necessarily to spend all your time creating really elaborate meshes.gr.joint(name, {xmin, xinit, xmax}, {ymin, yinit, ymax}): Create a joint node with minimum rotation anglesxminandymin, maximum rotation anglesxmaxandymaxand initial rotation anglesxinitandyinitabout the x and y axes.pnode:add_child(cnode): Addcnodeas a child ofpnode.gr.material({dr, dg, db}, {sr, sg, sb}, p): Return a material with diffuse reflection coefficientsdr,dg,db, specular reflection coefficientssr,sg,sb, and Phong coefficientp.node:set_material(mat): Assign the given material to the given node. Node materials can be changed at any time.node:rotate(axis, angle): Rotate node about a local coordinate axis ('x','y'or'z') byangle(in degrees).node:translate(dx, dy, dz): Translate the given node by (dx,dy,dz).node:scale(sx, sy, sz): Scale node by (sx,sy,sz).
We have created the "glue code" for you (i.e., the code that defines these Lua functions and makes them available in your puppet script), and bound these to functions and methods within the scene graph. You may also add Lua bindings to the assignment if you want to support other new features, but make sure the functions described above continue to work as written.
As an intermediate milestone, you can test your implementation with
the provided file a3mark.lua, which should render to produce
the image a3mark.png. We will
use this script to test some of the functionality of your assignment
ourselves.
The interface
As always, your application should include a GUI panel implemented in ImGui, supporting at least the following features. Most features have associated keyboard shortcuts indicated in parentheses. You may, but are not required to include these shortcuts in the actual names of the items as they appear in the GUI.
- There should be a menu bar across the top of the GUI panel containing Application, Edit and Options menus, each described below.
- The Application menu should contain the following five
items:
- Reset Position (keyboard shortcut I): Reset the origin of the puppet to its initial position.
- Reset Orientation (O): Reset the puppet to its initial orientation.
- Reset Joints (S): Reset all joint angles, and clear the undo/redo stack.
- Reset All (A): Reset the position, orientation, and joint angles of the puppet, and clear the undo/redo stack.
- Quit (Q): Terminate the program.
The Edit menu should contain items labeled Undo (U) and Redo (R), which maintain an undo/redo stack of transformations. All joint transformations should be saved to the stack. The paradigm is that when you release a mouse button when in joint manipulation mode (see below), the current joint angles are stored on the undo/redo stack. Initially, the stack contains just the initial joint angles. We may think of saving a new state as pushing a new layer of state onto the stack. At all times, you should maintain a current position in the stack. Selecting undo from the edit menu will restore the joint angles to the entry below the current position (and update the position marker to that entry). Selecting redo will update the joint angles to the entry above the current position (and update the position marker).
If several joint transformations are undone, and a new joint transformation is initiated, all undo/redo entries above the current one should be cleared. If Reset All or Reset Joints are selected from the File Menu, the undo/redo stack should be cleared to its initial state. You should provide reasonable feedback to indicate that an attempt to undo or redo past the end of the stack has been attempted (and not allow the action).
A standard object-oriented approach to maintaining an undo/redo stack is to use the Command pattern (which you may have seen in CS 246). It may help to consult Robert Nystrom's online tutorial about the Command pattern in game programming.
- The Options menu should include the following options.
Each one should be a checkbox menu item, capable of being
enabled or disabled independently of the others.
- Circle (C): If checked, draw a circle to indicate the region of the screen being used as the boundary for trackball rotation. The circle is drawn for you (unconditionally) in the skeleton code.
- Z-buffer (Z): If checked, use depth buffering when drawing the puppet.
- Backface culling (B): draws the puppet with backfacing polygons removed.
- Frontface culling (F): draws the puppet with frontfacing polygons removed.
- Beneath the menu bar there should be two radio buttons
used to select the interaction mode for the main application
window. The modes are as follows:
- Position/Orientation (P): Translate and rotate the
entire puppet. This should be the initial mode when the
application is launched. In this mode, the different mouse
buttons have the following effects.
- Dragging with the left mouse button held down changes the x and y translations of the puppet in world coordinates. (For example, modifying the puppet's x translation should always move it left and right on the screen, not relative to its current local coordinates.)
- Dragging with the middle mouse button held down changes the z translation of the puppet; moving the mouse up on the screen should move the puppet away from the viewer, and moving it down should bring the puppet closer.
- Dragging with the right mouse button held down should initiate a "virtual trackball" that controls the orientation of the puppet around its own origin. Imagine a virtual sphere centered in the application window whose diameter is 50% of the width or height of the framebuffer, whichever is smaller (as demonstrated by the circle drawn in the skeleton code). That sphere will act as a virtual input device for comunicating 3D rotations to the application.
It may help to introduce extra transformation nodes near the root of the puppet to store its translation and rotation.
- Joints (J): Control joint angles. In joint mode
the three mouse buttons act as follows.
Clicking with the left mouse button selects or deselects individual joints. A joint is selected by clicking on part of the geometry immediately beneath it (for example, clicking on the lower arm should select the elbow joint). Clicking on geometry not immediately under a moveable joint should have no effect. Clicking on a selected joint should deselect it. The selection operation is a toggle: it must be possible to have multiple joints selected at the same time.
Picking is implemented by switching into a special rendering mode in which all lighting and materials are discarded, and objects are rendered in false colours that encode each object's identity. (Note that every
SceneNodeinstance already has a unique serial number stored inm_nodeId, which you can map to the false colour of the primitives.) You can then read the colour of the framebuffer at the mouse location to know which object was selected. You'll have to create a new fragment shader or modify the existing one to enable picking. We may provide some additional sample code to demonstrate this process later.Selecting an item should cause a visible change in the rendering of that item (by changing the material).
- Dragging with the middle mouse button should change the angles of all selected joints. In particular, use the relative y motion of the mouse to increase or decrease joint angles, clamping to their defined ranges as needed.
- Dragging with the right mouse button should be used purely for the operation of rotating the head to the left or right. This manipulation is applied only if the head is selected. Note that it should be possible to use the middle and right mouse buttons in combination to turn the head in conjunction with other joint motions.
- Position/Orientation (P): Translate and rotate the
entire puppet. This should be the initial mode when the
application is launched. In this mode, the different mouse
buttons have the following effects.
Note that in the assignment code, the M key will show and hide the GUI panel entirely. It can be useful to hide the GUI panel for saving glamour shots of your puppet.
Donated code
The code provided at the start of the term contains everything you need to
get started with Assignment 3, including a standardized installation of
the Lua scripting language in the code/ folder.
In the A3/ folder, you'll find what should be a familiar
layout of files by this point in the course. You shouldn't need to make any
changes to the startup code (main.cpp) or the Lua glue
code (lua488.hpp, scene_lua.hpp, and
scene_lua.cpp), but you're likely to end up touching the
other source files. Of course, you may wish to change other files if
you extend the basic application. That's fine, as long as the program
works as expected on our sample input. If you're unsure whether a
change is acceptable, feel free to ask on Piazza or by email.
The A3 executable requires a command-line argument as input,
specifying the filename of a puppet Lua file. The Assets/
directory includes several sample files, including a3mark.lua,
which we'll use as part of marking.
Deliverables
Prepare and upload a ZIP file of the A3/ directory, omitting
unnecessary files (executables, build files, etc.). Make sure to include
a puppet.lua file the A3/ directory, which contains
the model you are officially
submitting. (You can include other Lua files if you want.)
In your directory, include a README file and a screenshot
(one that includes the GUI panel).
If you omit either file, you will receive a deduction. In your
README, please include two additional bits of documentation:
- Document any changes you make to the data structures used in the application.
- Give a high-level overview of the hierarchical model of your puppet, possibly including a diagram showing how the components are related to each other..
Objective list
Every assignment includes a list of objectives. Your mark in the assignment will be based primarily on the achievement of these objectives, with possible deductions outside the list if necessary.
Assignment 3 objectives
-
▢
The test file (i.e., the
a3mark.luathat comes with the skeleton code) runs and displays correctly. (For testing purposes we will use our own unmodified copy of this file.) - ▢ The puppet's proportions are reasonable and its primitives are joined together in a logical fashion. The primitives are "hinged" to their neighbours at their ends—they do not rotate about their centres.
- ▢ Picking works correctly and reliably.
- ▢ Selection records are kept correctly so that any sequence of selections and deselections works. Multiple selections are supported. Selected portions of the puppet are clearly indicated, e.g., selected parts change colour, or their edges are highlighted.
- ▢ The puppet can be globally rotated and translated for viewing purposes. The rotation user interface is a virtual trackball. A circle representing the virtual sphere can be turned on or off from the menu. It must be clearly visible when it is turned on. The puppet's configuration can be reset from the menu.
- ▢ A well-designed hierarchical data structure is employed. Primitives are drawn in a reasonable way, making efficient use of OpenGL buffers.
- ▢ The joint movements are correct and the angles are restricted so that no grossly unnatural configurations are allowed. The puppet does not fly apart or distort during any sequences or combinations of actions.
- ▢ Z-buffer, backface and frontface culling all work correctly and can be enabled and disabled from the user interface.
- ▢ Lighting and materials are chosen so that the 3D structure of the puppet is clearly visible.
- ▢ An undo/redo stack is maintained for interactive joint manipulations.